How To Install Windows 10 on Mac Using Boot Camp Assistant
Macs are known for having their own operating system, macOS, but it’s also possible to install Windows 10 on your favorite Apple laptop or computer. This will give you access to the full range of Windows products, including Microsoft Word, PowerPoint, and Excel, as well as Windows PC games.
In this blog post, we’ll be covering the steps you’ll need to follow for How to install windows 10 on mac using Boot Camp Assistant.
Why Use Bootcamp Assistant?
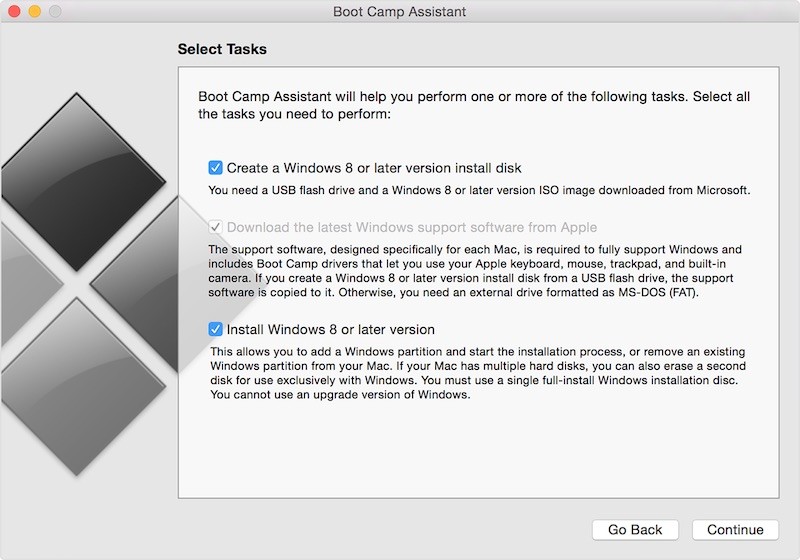
Boot Camp Assistant is the built-in support wizard for Mac that allows you to install Windows 10 on your hard drive. There is no need to download an external support system; just open Bootcamp and it will guide you through the process.
Boot Camp doesn’t just let you install Microsoft Windows; it will also let you use your Apple keyboard in Windows. Keyboard commands work a little differently between Macs and PCs. Boot Camp can help you bridge the gap.
System Requirements
You can use Boot Camp on any Mac computer that has OS X Yosemite or higher. OS X Yosemite was first released in 2014.
You will need the correct support drivers in order to use Windows 10 with Boot Camp, but these are automatically downloaded when you use Boot Camp Assistant.
For Macs, Windows 10 is available from Microsoft as a USB file and an ISO file. “ISO” means that this is a file, or image, that represents the contents of an entire CD or DVD. So, rather than using a DVD or CD containing the software required to download Windows 10, you can use the ISO file to do the download.
If you choose to use a USB file to download Windows to your Mac, make sure it is a USB 2; the download won’t work on a USB 3 flash drive. Older Macs will need a 16 GB USB for the install. (See below for which computers support Windows 10).
Your startup drive will need at least 30 GB of free space to hold the new install.
Mac Computers That Support Windows 10
Macs that support Windows 10 include the Mac Pro, Mac mini, iMac, MacBook, MacBook Air, and the MacBook Pro, and models of these computers from 2012 onwards.
Macs that don’t need a USB for the Windows 10 install are:
1. MacBook Pro (2015 onwards)
2. MacBook Air (2015 onwards)
3. MacBook (2015 onwards)
4. iMac (2015 onwards)
5. Mac Pro (late 2013)
Features Supported in Windows 10
The latest version of Windows support software that is available from Boot Camp Assistant will support the following features of your Mac laptop or computer in Windows 10:
1. USB 3
2. USB-C
3. Thunderbolt
4. Built in SD or SDX Card Slot
5. Built in, or USB, Apple SuperDrive
6. Apple mouse, keyboard, and trackpad
More Information About Windows 10
With Windows 10, Microsoft added some design updates that make its operating system lighter, modern, and more beautiful. Microsoft tends to be known as the clunky sibling to Apple’s zippy macOS operating system, but Windows 10 brings some fresh updates. These include an emoji keyboard, and a new look for Photos and People. The minimize/maximize/close buttons were also incorporated directly into the window, streamlining these interface elements.
File Explorer is the Windows version of Apple’s Finder feature, which lets you look for recent files. In Windows, this feature is self-populating, meaning you can pull up your most recent documents, images, and videos without having to do a long search. Windows 10 also brought the return of the Start menu, which had mysteriously disappeared in Windows 8.
Most operating systems now offer “cloud” storage, which means you can access your files from anywhere, on any device. In Apple, this is iCloud; Windows has OneDrive, which is slightly less intuitive to use. You can see a shortcut to your files that are saved in OneDrive, but you have to download the file before you can edit it.
One of the biggest changes to come to Windows 10, though, is the arrival of Windows Mixed Reality. Mixed Reality Viewer is an augmented reality app that lets you merge digital images with the real world on any device that has a webcam.
How to install Windows 10 on mac using Boot Camp Assistant
Before you install Windows 10, make sure your Mac is backed up, then follow the simple steps below.
Getting Started
1. Review the system requirements to make sure that your Mac supports the latest version of Windows.
2. Insert the DVD or flash drive into your Mac. If you are using the ISO file version, Boot Camp will show a modified interface that puts the ISO image selector and partitioning side-by-side. If not, Boot Camp will require a disk image file of Windows.
Begin The Install – DVD/flash drive version
1. Once you have inserted the DVD or flash drive into your Mac, the media will appear in Finder (Apple’s Version of File Explorer).
2. Open the disk utility and select the install file in the pop-up window that appears.
3. At the top of the window, click the New Image icon. You’re preparing to save the install file in ISO format.
4. A dropdown window will appear. Select “DVD/CD master” under Image Format, then choose “none” when it asks you for encryption options.
5. Name the file, then click Save. The program will create an image file.
6. Eject your disk or USB drive once the image file has been created.
7. Find the new disk image, then rename it from .cdr to .iso.
Begin The Install – ISO file version
If you are already using the ISO file version from Windows, you can jump right in to the following steps.
Create A Windows Partition
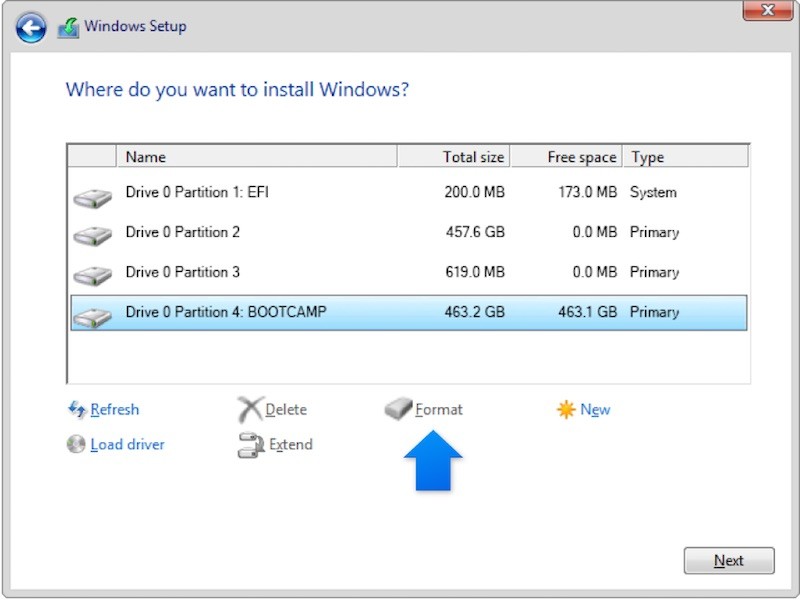
What’s a partition? This is the part of the install where Boot Camp Assistant will ask you where you want to install Windows. You can use Boot Camp to create the partition and the Windows Installer will format it.
1. Boot Camp can create the partition automatically for you. You can do this by searching for the program either in Utilities or Spotlight. The partition needs to have at least 30 GB of space; in some Macs, it may need more.
2. Once Boot Camp has created the partition, it will ask you where you want to install Windows. Select Boot Camp.
3. Click Format. Windows will now format the partition.


Finish The Install
Follow the on-screen prompts to finish the install. Boot Camp makes this easy.
Restart Your Computer
Restart your computer once the install is finished. In the Startup Manager, you can switch between OS X and Windows. To do this, press the Option key. You can then choose which operating system you want to use. The Boot Camp system tray will also let you switch back to OS X if you are in Windows. Click the Boot Camp icon in the system tray, then choose the Restart in OS X option.
Conclusion
Installing Windows 10 on your Mac using Boot Camp Assistant doesn’t need to be intimidating – or require professional help. Armed with these tips, you'll be ready to get started.
